
Some telltale signs that your transmission has gone bad are:
Whining and grinding noises while driving, if the transmission is running only in forward or reverse mode if it is leaking oil if it is working fine after a cold start and loses power as it warms up when problems accumulate gradually with time (a sudden power loss usually indicates that the problem is not related to the transmission).
If you notice these symptoms, this article may help.

Common K46 transmission problems.
Let’s start with a simple problem. Worn-out input shaft pulley with worn splines. Typical symptoms are slow performance and immobility.
As we have established before, bad oil is the usual suspect in most transmission problems.
Bad oil can damage the drive shafts and input shaft seals and cause oil leaks. If the oil level is insufficient, the hydraulic system will not have enough pressure to transfer energy. Typical symptoms are whining noises, loss of power, or complete immobility.
Differential and reduction gear-set gears along with bearings can be damaged by excessive metal fillings in the system. The process quickly spirals as the chipped gear parts cause even more destruction. Typical symptoms are unstable mobility, slipping, and grinding noises.
The most common problem, however, is worn on the pump and motor pistons and their ports. Again, premature wear is usually caused by bad oil full of metal fillings. Typical symptoms are Loss of power, slipping, and howling noise. Symptoms usually get worse as the transmission and the oil in its warm-up.
What can cause problems with your integrated hydrostatic transmission or IHT?
Timely maintenance is usually enough to prevent transmission failure, but the problem is that many tractor manufacturers claim that “their transmissions do not require maintenance,” while the actual transmission manufacturers, like Tuff Torq, have a different opinion than aliens with common sense.
Regrettably, many people are misled by claims that these transmissions are “unserviceable”, increasing the number of premature wear cases.
If you operate your tractor in extreme conditions such as high temperatures, rough terrain, and dust, you need to change the transmission oil even more frequently.
Oil is essential to the gearbox, ensuring the health of all the components in it by providing proper lubrication and cleaning.
However, when the oil in the transmission ages, it begins to lose its viscous ability as it accumulates metal fillings, and interacts with seals and metals. It loses its chemical integrity over time as it goes through friction and high temperatures. Old oil leads to premature wear of transmission components.
Metal filings are a natural by-product of the working transmission. But when the amount of these fillings in the oil exceeds a critical point, the oil becomes a dangerous abrasive substance, causing destruction and death wherever it goes instead of lubrication and rejuvenation.
Catch magnets along with the oil filter protect the transmission from filling, but if they become clogged with metal shavings or other debris, they will no longer protect the transmission. And capacity of these magnets along with the filter is limited.
Poor quality “for life” oils used by manufacturers chemically affect gears and other metal parts, destroying their molecular structure.
Of course, if your gearbox is fairly old and out of its resources, it can develop problems even with proper maintenance (though it will happen much later).
Excluding problems with symptoms similar to a transmission failure
Shutdown, loss of power under load, or tractor is unable to move on its own. These symptoms may be caused by other tractor problems.
Engine. Take a listen to how it works. If it runs smoothly in response to throttle inputs with no misfires and no choking under load, look elsewhere for the problem. Otherwise, a thorough inspection of the engine and ignition, and fuel system is required.
If your lawn mower stalls as soon as you put it in gear, you may want to check the seat safety switch which may be broken and unable to detect a driver in the seat causing the engine to shut off.
To test your seat safety switch, lift up your seat, unplug the lead wire terminal from the safety switch and test the switch for continuity with an Ohmmeter in both off and on positions by testing corresponding switch pairs of contacts (there are four contacts that make two pairs, ON and OFF). Change the switch if it’s bad.
If your tractor mower fails to move when you engage the forward travel pedal or loses power when under load, you should also check the drive belt. To check the drive belt, start your engine up and put it on full throttle, then engage the electric PTO switch.
If you hear your blades kick in (spin) immediately after engaging the PTO (in under half a second), your belts are fine; otherwise, when blades kick in with a delay or don’t kick in at all, you have A belt problem, but it can be just a deck belt problem.
To check the drive belt, you’ll have to remove the mower deck first. You need to check the tension (keep in mind that when the brake is engaged, the drive pulley is loose causing the belt to loosen a bit as well). You should change the drive belt if it’s too old/slack and has visible wearing marks on it.
Belt problems can also be caused by bad or stuck pulleys. However, to inspect all pulleys, the drive belt must be completely removed.
Again, this may be strange, but make sure the bypass valve lever on the back of the gearbox (used to tow the tractor) is not pulled out.
If not, it’s probably the gearbox.
What do you need for troubleshooting your transmission?
If you’ve established that the rest of your tractor is fine, and you suspect your transmission, you’ll need to inspect it thoroughly. For that, you’ll have to remove if from the tractor and take it apart.
First, safely park your tractor and remove the mowing deck, jack the tractor up by the tow hitch and put jack stands under its frame (in front of the transmission), disconnect all the lineages (break, travel pedal, bypass valve linkages along with reverse sensor terminal).
Uninstall the drive belt tensioner that sits on the frame atop the transmission and take the belt off of the transmission input shaft pulley. And unscrew the metal reverse sensor plate that sits near the right bracing.
Then carefully place the jack under the transmission, unscrew the two bolts that hold transmission bracings on its sides to the tractor frame along with 4 bolts that hold its axles to the frame at the bottom, and carefully lower the transmission dawn.
You would need 10 mm, 13 mm, and 14 mm (for the reverse sensor plate) sockets and a 13 mm wrench (to hold the axle nuts in place while you unscrew the bolts with a socket).
Taking apart the transmission for a thorough inspection
First, take a look at the exact transmission model on the barcode that’s located on the axle part of the transmission and use it when ordering any parts for it.
Take a pair of side cut pliers or snap ring pliers and take the snap ring out of the fan/pulley assembly. Inspect your drive pump pulley, it should spin along with the input drive shaft and should sit tightly on the shaft.
If your pulley spins freely and wiggles on the shaft, it is worn out, has worn-out splints, and should be replaced (it might fix your problem altogether).
Take off your pulley (you may inspect it more closely) and take off the fan.

Upper case transmission picture.
Then place your transmission on an even surface and make it level with the help of some chocks. Locate your oil fill plug (20), it’s a bigger flat plug that sits on the left side of the transmission (do not mistake it for a vent plug), and pry it off with a screwdriver (you can tap the screwdriver upwards around the plug with a mallet if you like to be more gentle).
Take out the filing catch magnet that sits inside, remove the metal base, notice the number of metal filings stuck to the catch magnet and clean it thoroughly.
Measure your oil level with a metal ruler, it should be around 20~25 mm (3/4”~1”) below the lip of the (black cap) port when at room temperature.
If the oil level is lower than that and your catch magnet has little to no fillings on it, you should consider replacing your drive axle and input drive/pump shaft seals (they could be the reason for low oil and bad transmission performance). Take a look at the seal replacement manual here
Before taking your transmission apart, prepare a big bucket or some other volume and drain the oil to it through the fill plug for about half an hour. Then place your transmission securely (upside down) with lowercase facing upwards and input driveshaft facing the floor.
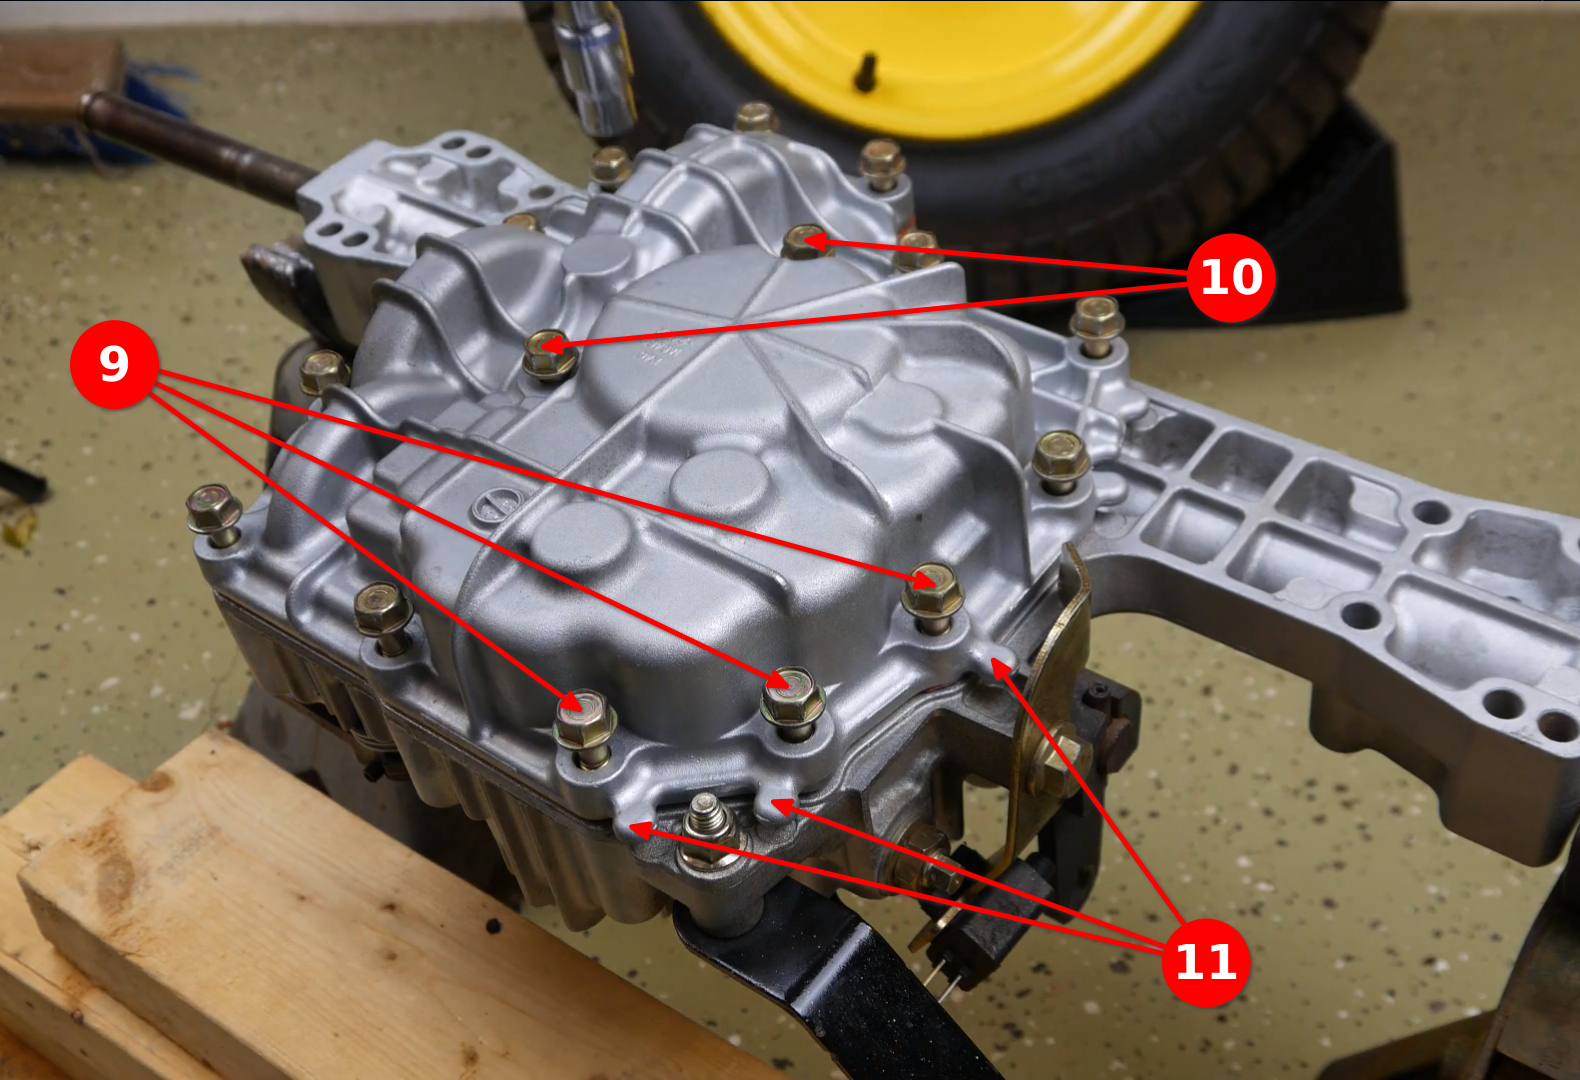
Lowercase transmission picture.
Unscrew all the bolts (9) that hold the lowercase to the transmission body with a 12 mm socket. Keep in mind that two center bolts are longer (10) so make a mark on their respective crew holes to know their location for the future.
Once unscrewed, carefully pry lose the lowercase by leveraging specially casted pry points (11) located on the sides of the lowercase body with a large flat-headed screwdriver. Remove the lowercase from the gearbox.
Clean the lowercase and uppercase case foam sealant residue using a degreaser (like brake pad cleaner), a scrubber, an Exacto knife, and a metal brush. Be careful not to get any residual into the uppercase and thoroughly clean the channel around the lowercase mating service.
Inspecting the insides of your transmission
To understand what you are gonna be doing, take a look at this transmission diagram:

First, take a look at your oil filter (12) and a second filing catch magnet (13) located near the differential. If they are very dirty, it can be a bad sign. Remove the oil filter and clean the magnet of the filings.
If the magnet was dirty, inspect your differential (19) and reduction gear set: (22) wiggle the gears around, they should have little to no play; then you can carefully remove your gear train for further visual inspection, noting the position and orientation of every gear and washer
If gears have visible damage to them or visible wearing, they should be replaced. A common symptom of a bad gear train is grinding noises when in motion (also a catch magnet near the differential is a good marker).
If the gear train is fine, the problem lies in your center block (14).
One strong symptom that the problem is within your center block: a prominent wining nose and zero response when you press the travel pedal.
Your options are: to buy a brand-new assembly; disassemble the center block and inspect the motor and its pistons (23), oil pump within the main block and its pistons, IDS valves, motor output shaft (24) and swash plates (they all should fit tightly, have no play and no wearing) then change the parts that went bad; sending your center block for a rebuild to a professional.
I recommend the latter option as the brand-new assembly is pretty expensive and rebuilding it yourself will be extremely time-consuming.
In any case, you will have to remove your center block (14) by unscrewing three 14 mm bolts (15) that hold it in place and prying it out. Be very careful not to lose anything when lifting it out (springs, pins, washers bearings, or valves), note the position of the motor (static) swash plate (25), brake disk (16), brace calipers (17), and brake actuator (26), output shaft bearing and jerky plate (18).
If your transmission is damaged to the point where you have to replace components, if it has broken teeth, worn-out center block, or metal debris in the oil; it is recommended to take everything out and thoroughly clean the case as well as the parts.
On the other hand, if the transmission is in good condition but is just old, you can consider putting in more dense transmission oil (like 10 W40).
Also, you should check the integrity of the drive/pump input shaft (21), its splints should be in great shape and its bearing shouldn’t have any play. And you can check the drive shaft bearings while at it.
Additionally, you may take a look at Tuff Torq repair tips here.
Putting it all back together
Basically a reverse process. First, install (the shafts if you have uninstalled them) the differential (19) and the gear train (22). You should squirt some oil on the gears to prevent them from damage while there is no oil yet. Make sure that nothing is missing and everything is in the right orientation.
Make sure to tighten three 14 mm bolts of the center block to 33 – 40 ft. lb.
Don’t forget to install a brand-new oil filter.

Use a transmission seal-maker to make a seal on the lowercase meeting suffice (don’t forget about hydrostatic and gear chamber separator wall). Put it on the uppercase, tighten 12 mm bolts by hand (put the longest two center bolts first in marked ports) and let it sit for an hour. Then tighten your lowercase bolts to 16 – 18 ft. lb.
Flip the transmission (so that the fill plug is facing upwards) and fill it with 2.3 or 1.9 liters (depending on the K46 submodel) Hy-Gard High Viscosity J20C** 10 W30 oil or any other synthetic 10 W30 transmission oil. The oil level should be around 20~25 mm (3/4”~1”) below the lip of the (black cap) port when at room temperature, but you have to pour a little more to account for the air purging procedure.
If you have a universal socket and a strong electric screwdriver, you can purge the air from the transmission by spinning the input drive/pump shaft back and forth with it for 5-10 minutes.
Put the fan, the drive pulley on the pump shaft, the washer, and the fixating c clip. Then follow the transmission uninstallation procedure backward, only do not take the jack stands from under the tractor and don’t lower it just yet (if you haven’t purged the air with an electric screwdriver).
One less step while the tractor is still on the jack stands, purging the air (if you haven’t done it yet) from the transmission. Turn the tractor on and let the transmission work in forward and reverse mode as well as in neutral by pulling the bypass valve lever at the back of your transmission into towing position. Let it run like that for about 15 minutes.
Lower your tractor on the ground and enjoy.

hello..I have a tractor with hydrostatic gearbox K46…I changed the filter and now that I have mounted the whole tractor it goes backwards???..I ask kindly what could I have done wrong??..thanks..Kind regards. ..Tarcisio Baccichet
If you reassemble the #25 piece upside down , the controls will act opposite to what you had before. I learned this the hard way too. There is no rule as to which way that block goes, it’s dependant on the tractor manufacturer and the way they wanted the controls to go. You have to observe the orientation before disassembly.