
Timely maintenance is critical to the life span of any equipment, and when it comes to engines: even more so as they are intricate mechanisms that have a lot of moving parts with precise fitment tolerances, and it all has to withstand the ludicrous amount of friction and insane temperatures.
Oil is as critical to an engine as blood is to our bodies, it helps to regulate engine temperature and insures the health of every component in it by providing adequate lubrication and cleanup of the services.
But as the oil in your engine gets old, it starts to lose its viscous abilities, because carbon build-up and hot temperature affect the chemical structure of the oil over time. Thus, old oil leads to premature wear of engine components.
The oil filter is also a very vital part of your engine, it is the engine’s kidneys that clean its blood (oil from poison) and the buildup of metal filings in the oil.
While the metal filings are a natural byproduct of the engine’s operation; when the amount of these filings in the oil surpasses a critical point, the oil becomes a dangerous abrasive substance that brings destruction and death everywhere it goes.
Instead of lubrication and rejuvenation, it is supposed to bring. When the oil filter clogs up with metal filings and other debris, it stops protecting the engine.
So it is absolutely necessary to service the engine on your tractor mower and change the oil along with the oil filter in time, even after the warranty on it has expired.
And if you don’t want to splurge for the dealership or serviceman oil change, you can do it yourself. In this article, I’ll walk you through the process.
Requirements:
Make sure that you’re following all the precautionary, safety measures when working with flammable materials and machinery. If that’s the case, let’s proceed further.
You’ll also need an oil filter wrench/clamp, a plastic funnel, protective thermal gloves (or any other thick cloth gloves) and some container for draining the old oil (like a bucket or a plastic canister with a cut-off side). Make sure to properly dispose of old oil, be environmentally conscious.
What type of oil and how much of it your John Deere D140 need?
D140 has Briggs & Stratton 40 four-stroke, air-cooled, V twin 2 cylinder gasoline engine.
It uses 10W-30 engine oil.
Oil capacity: 1.9 L (2.01 US. qt, 1.67 Imp. qt.)
What type of oil filter to use?
Your John Deere D140 uses an oil filter with the following dimensions:
O.D 3″, Height 2-5/16″, Thread 3/4″-16, 25 Micron
OEM part number:
JOHN-DEERE AM125424
How frequently should you do the oil maintenance?
John Deere recommends replacing the oil and the oil filter every 50 moto hours (along with the air and fuel filters).
They also state that the oil should be changed more frequently under harsh conditions:
• Extremely dusty conditions.
• Frequent slow or low-speed operation.
• Frequent short trips.
• Operating in extremely hot climates.
Also, even if you use the mower less than 50 hours a season and operate it in optimal conditions, you still should change the oil once a season as oil starts losing its chemical integrity needed for proper lubrication after a year of sitting in the engine when it already had contact with carbon byproducts and was thermally affected.
Changing the oil and oil the filter:
Park your tractor on an even surface, engage the parking brake, turn it off and get the keys out of the ignition.
Make sure that the front wheels are turned all the way to the left.
It’s best to perform the oil change when the engine is still hot, but be very careful not to burn yourself touching the engine components and wear protective thermal gloves (or any other thick cloth gloves).
Note: Oil is hot when the engine has been running for a while (10 minutes or more) or when it is just stopped.
Open up your hood and fix it in the open position.
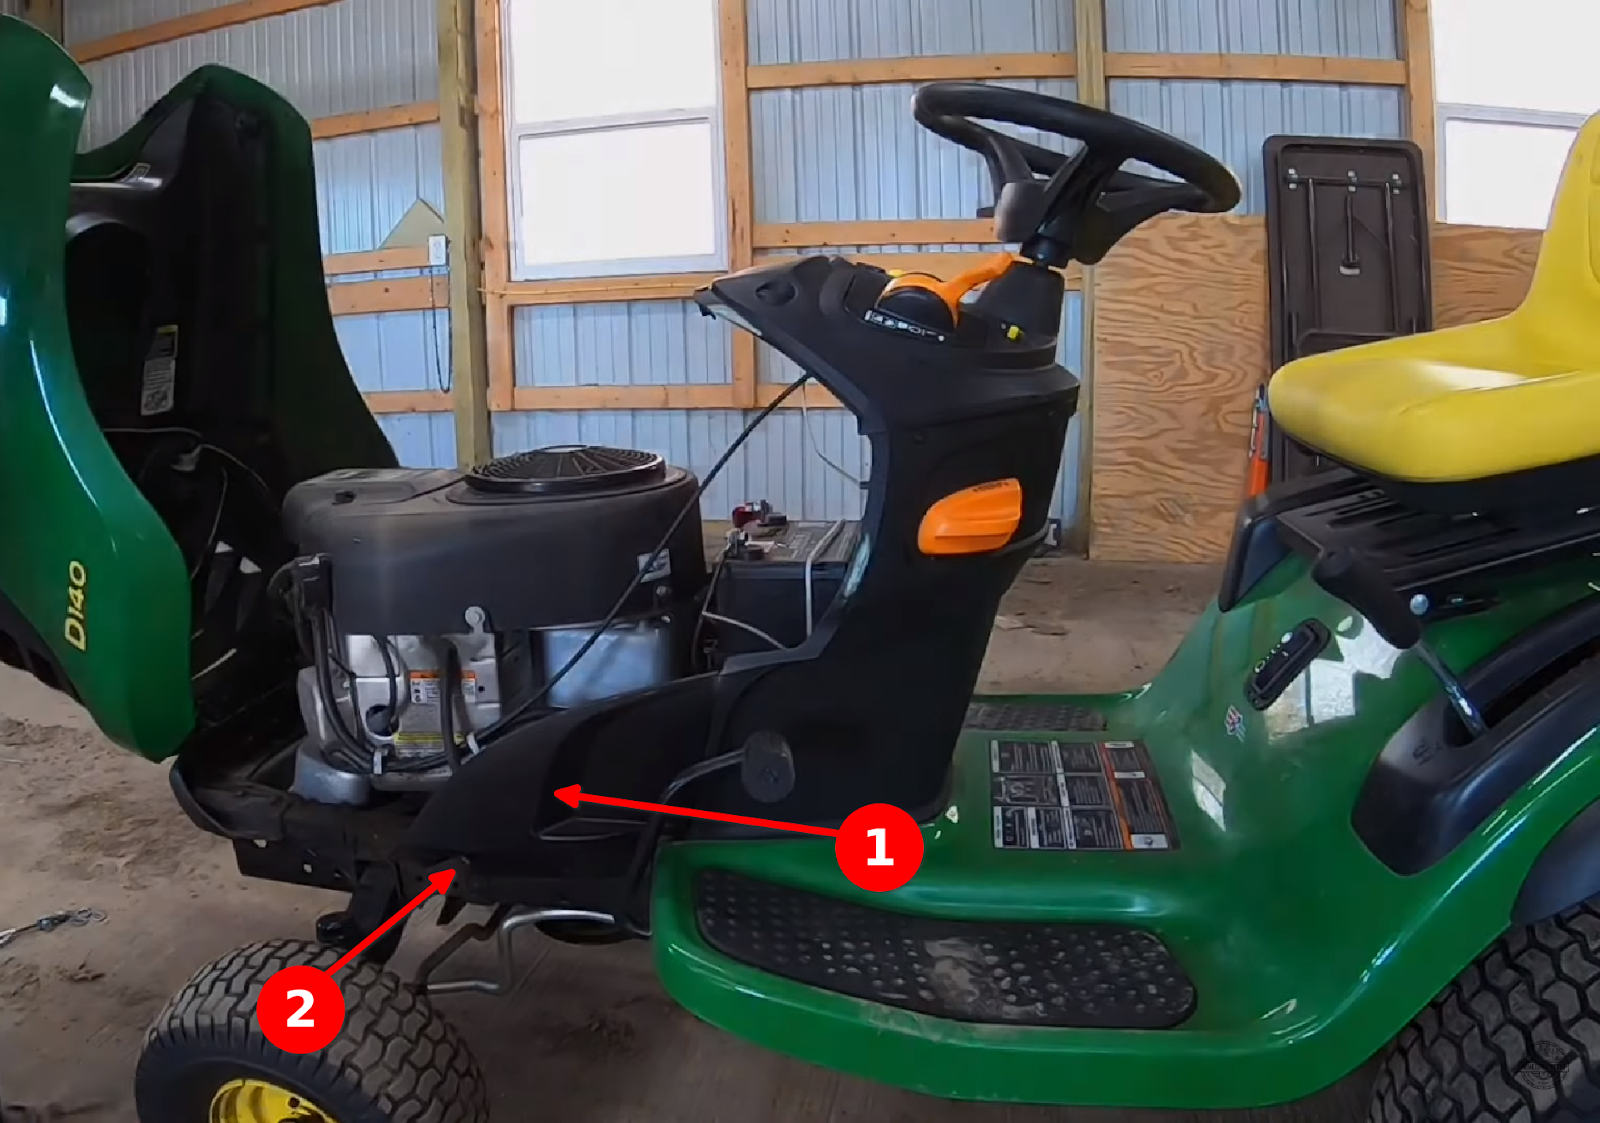
Unscrew the two black plastic guard quarter panels (1) that sit on each side of the engine bay with a 10 mm wrench or socket and roll them front-wise or take them off completely to allow access to the drain port and oil filter on opposing sides of the tractor. These panels are screwed to the frame with one 10 mm bolt (2).
Go to the right side of your tractor and locate the oil filler screw cap (3) unscrew it for smoother draining (do not lose it).
The cap is yellow in color and the filler port sits atop the engine near the right side of the air cooler plastic body.
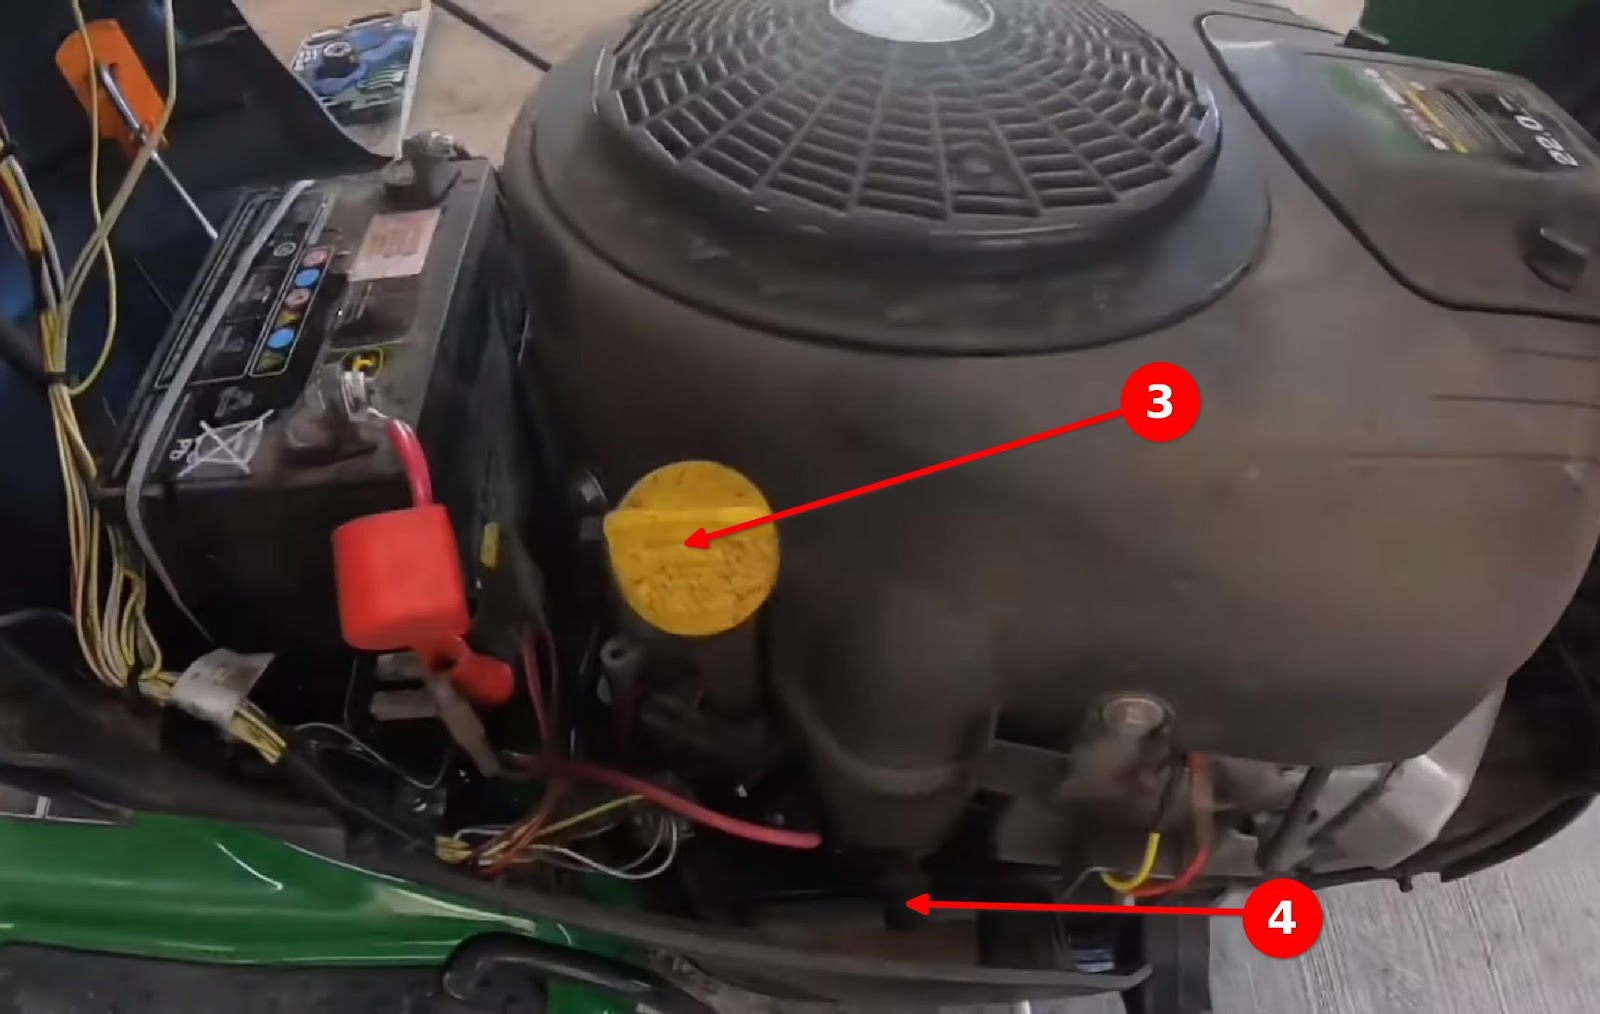
You may also check the old oil level with the dipstick that is built into the filler cap for diagnosing potential engine problems.
locate the oil drain plug (4) on the right side of the tractor that comes from your engine, under the flywheel, as a thin drain pipe. That pipe should sit right on the tractor frame (behind the right wheel).

Put the previously prepared drain container below the plug so that it would aim the oil in it.
Remove the drain plug (4) by slightly twisting it to the left (note that it has the L-shaped groove), then pull it out and drain the oil to the container (you may want to adjust the container to better catch the draining stream).
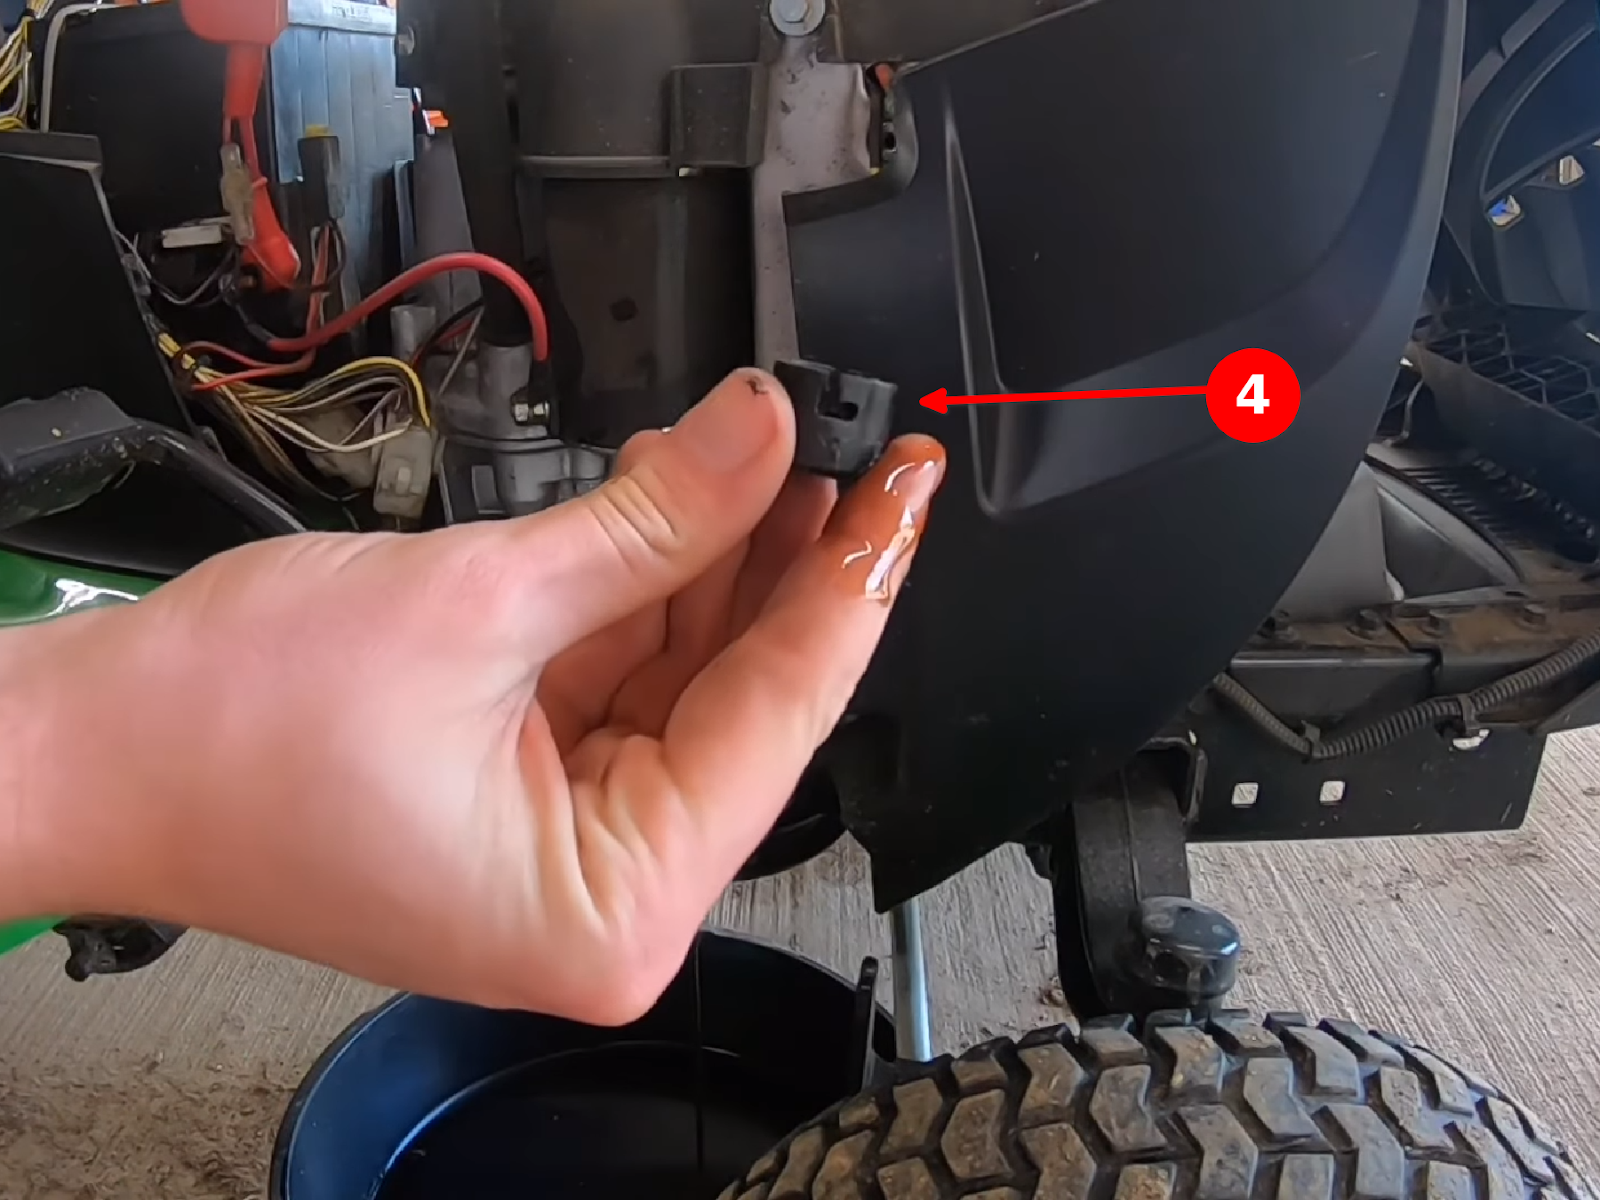
Once the oil has fully drained, plug back the drain plug.
Go to the left sight of your tractor and locate the oil filter (5). It should sit right on the tractor frame (behind the Left wheel, under the flywheel).
Loosen the oil filter with the oil filter wrench/clamp (6) and unscrew it with your hands.

Take the brand-new oil filter out of the package and lubricate its inward side edge circumference with fresh oil to form a seal, either with some sort of tampon previously dipped in the fresh oil or some cloth.
Screw the new oil filter and tighten it by hand (do not use an oil filter wrench/clamp for tightening the brand-new oil filter).
Go to the right side of your tractor and locate the oil filler cap (3).
Unscrew the oil filler cap (if it’s there), put it in the plastic funnel, and pour fresh oil inside.
Test the level with the dipstick, it should be in between two punch-holes on the dipstick.
When you’ve finished filling up the oil, put the dipstick in, screw the oil filler cap on the filler port, screw the two black plastic guard quarter panels (1) back in please, close the hood and enjoy.
Important:
If you’ve noticed that your old oil level was considerably lower than the norm (between two punch holes on your dipstick) or when there was light smoke coming from the exhaust, you may want to take your tractor to a serviceman to check the engine compression.
You may have bad piston rings. And it’s also a good idea to check the gaskets when you have these symptoms.
Also, if you’ve noticed abnormal amounts of metal filings in your old oil, you should definitely take your tractor to a serviceman for a thorough inspection.
