
Factory adjustment of carburetors of trimmers can be a cause behind many problems. This is because the tuning done in the factory is not always accurate.
But what exactly are we adjusting? The carburetor has certain screws which control the fuel mixture ratio. Proper adjustment of the carburetor, i.e., the correct tuning of these screws is essential for the trimmer to run properly.
So if your trimmer is refusing to run or bogs out, then follow this step-by-step guide to adjust your carburetor because it is highly likely that the problem is arising due to an unadjusted carburetor.
Key Takeaways
- Adjusting the HIGH (H) screw changes the ratio of fuel mix when the throttle trigger is squeezed
- Adjusting the LOW screw (L) changes the ratio of a fuel mixture when the trimmer is running idle
TOOLS NEEDED
Locate the Carburetor and the Screws
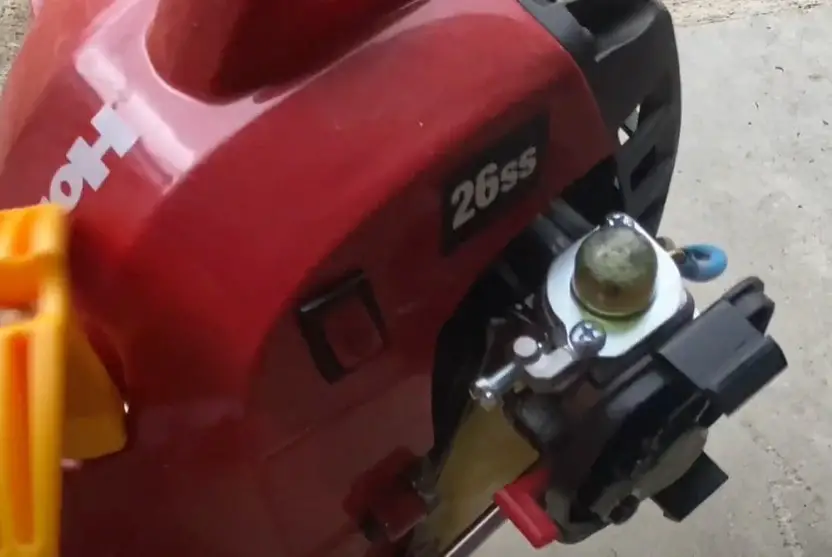
The following steps will guide you if you do not know where the carburetor or the adjustment screws are.
- Take off the air filter from the side of the trimmer to access the carburetor.
- The screws are present on the bottom of the carburetor.
- The screw closest to the air filter is the HIGH screw. The HIGH screw is labeled H and the LOW screw is labeled L.
HIGH Screw
The HIGH screw adjusts the ratio of fuel when the throttle trigger is squeezed i.e., the trimmer is to run on maximum RPMs.
If the HIGH screw has not been tuned properly, the mixture will not have the correct ratios required to make the trimmer run. Therefore, you need to tune the HIGH screw when the problem arises on giving throttle.
LOW Screw
The LOW screw is for the purpose of controlling the fuel mixture when the trimmer is running on idle, i.e., when you are not giving any throttle to the trimmer.
This means the screw must be adjusted so that it allows the correct ratios to be mixed for the proper working of the trimmer in an idle state. So, when the problem of your trimmer is arising in an idle state, you need to adjust the LOW screw.
What to do if Trimmer shuts down on Full Throttle?
This means the HIGH screw of your trimmer needs adjusting if your Homelite Trimmer bogs out when you turn off the choke and give throttle.
How to Adjust?
- Insert the Pacman screwdriver into the HIGH screw.
- Rotate the screw counterclockwise about half a turn.
- Once done, turn on the trimmer. Check if it’s still bogging out when you press the throttle.
- If you think that the speed is not maximum, then you can rotate the H screw a little more, in the same direction i.e., counterclockwise. But make sure you do this slowly. Leave the screw in the position where you feel like the RPMs are maximum.
Once you are done, release the throttle trigger to see how the trimmer behaves. If it runs fine and does not shut off, then your trimmer is ready to mow.
However, if the trimmer dies on leaving the throttle trigger, then you will need to adjust the LOW screw as well. The guide about how you can do so is given below.
What to Do when Trimmer shuts down on Idle?
Trimmer bogs out without any throttle? This means the LOW screw needs richening.
How to Adjust?
- Insert the Pacman screwdriver in the LOW screw.
- Rotate the screw half a turn in the counterclockwise direction.
- Start the trimmer. You should see some improvement now.
- Keep the trimmer on and rotate the screw slowly until you feel like it is working fine now.
There you have it, your trimmer should no longer bog out on idle.
Trimmer hesitates while switching from Idle To Throttle?
If your trimmer does not have a smooth transition from idle to throttle, then your LOW screw needs leaning.
How to Adjust?
- Use the Pacman screwdriver to rotate the LOW screw very slowly in the clockwise direction.
- Keep observing the trimmer’s behavior as you rotate the screw.
- Tune the screw to the point where the transition from idle to throttle becomes smooth.
Important Note – If you lose track and need to start over, then completely close both screws. Then rotate both about 2 complete turns and 1 half turn. Once you are done, you can start adjusting the screws.
